Wednesday, June 12, 2013

What's growing in the garden?

Team Wave wearing stylish and edible pea hats!!
Everything is growing in our IslandWood garden--including the children!  Team Wave from Sheridan Elementary School in Tacoma, Washington, enjoyed sampling garden veggies, wearing garden veggies and planting garden veggies.  A fun, full morning in the garden.

This past Spring our SOP students have been helping us plant seeds in the greenhouse.  Those seeds have grown into beautiful vegetable starts, which have all now been transplanted out into the garden.  The garden is looking so lovely and growing so rapidly, we just had to share a few pictures.

Here is a look at all things green and growing:
Scarlet runner beans climbing up sunflower stalks

Beautiful and interesting purple kohlrabi 

Red and green lettuces which have been tasted by both children and a few slugs...
Fresh garden broccoli tastes amazing!
Beautiful pea blossoms with pea pods coming soon
The kale have outdone themselves with huge tasty leaves!
The students have discovered that a drop of honey lives at the base of each Jerusalem Sage blossom--yum!

Here's to fresh and delicious garden food!

Tuesday, May 21, 2013

Heavenly Rhubarb Lemonade


Rhubarb lemonade was a huge hit with Team Rain from Salmon Bay Elementary!

Team Rain loved the rhubarb lemonade so much they nicknamed it "Rhub-ade". One team member remarked, "It wasn't rubade, it was heaven".  We agree!!

Rhubarb is a perennial vegetable that can be harvested in the spring and into the summer.
Just eat the stems, which are delicious in pies, cobblers and even lemonade! DON'T eat the leaves because they are poisonous. 

Rhubarb Lemonade
Combine in a saucepan:
2 to 4 cups chopped rhubarb stems (more rhubarb will make it more tart and colorful)
1 1/2 cups sugar
1 1/2 Tablespoons grated lemon zest
1 cup water
Bring ingredients to a boil and let it simmer over medium-low heat for about ten minutes until the rhubarb is soft. 
Set it aside and let it cool.

Meanwhile, cut 6 to 8 lemons in half and juice them with a reamer.  You should try to get about 3/4 cup lemon juice.

Fill a pitcher with about 8 cups of water and ice.  Pour the rhubarb mixture into a sieve and use a wooden spoon to press out as much of the rhubarb liquid as possible into the water.  You'll be left with the lemon peel and some rhubarb goo in the sieve, which you can eat (the kids thought it was delicious) or compost.

Pour the lemon juice into the sieve above the pitcher to remove the seeds and press gently to get the juice from the pulp.  Stir well and give it a taste.  Does it need more juice?  More water?  More sugar (I doubt it!)?

Serve with a fresh mint leaf if you wish - Mmmmm!

Wednesday, May 8, 2013

Soil to Snack: Corn Biscuits

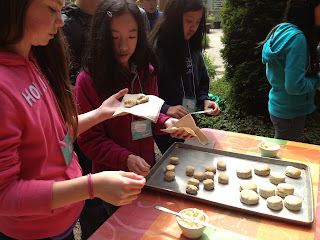
Warm May sunshine welcomed Team Forest, from Silver Ridge Elementary, into the IslandWood garden. Our Soil to Snack project was to make Corn Biscuits.  But not just any corn biscuits.  No, these were going to be truly Farm to Table, Slow Food biscuits.

What does Farm to Table and Slow Food mean?  For starters it means delicious, wholesome food, and I think Team Forest would agree as they devoured the biscuits!

We started with fresh local corn from Emily's farmer friends Aaron and Dana.  They farm Around the Table Farm in Poulsbo, WA using organic farming methods, companion planting and crop rotation.
Aaron

Dana

Not only was this corn grown with much love and care, but the soil it was planted in was tilled by two giant horses that belong to another local farmer, Betsy, from Laughing Crow Farm.  

Animal powered Farming!  Draft horses and sisters Abby and Red of Laughing Crow Farm

Beautifully colored corn, about to become corn flour!

Making the biscuits was a fun but slow process.  First the students took the corn kernels off the corn.

Olivia helping one of the students turn the mill wheel.
Next we used a grain mill to grind the corn into flour
The corn flour still has some of the beautiful colors
Jen helping the kids make the biscuit dough

We took the corn flour over to the cob oven in the garden, and started making biscuits.  The recipe calls for buttermilk, so instead of buying buttermilk, the kids made buttermilk!  All you need to make buttermilk is a carton of cream and lots of people willing to shake it.We put the buttermilk into a glass jar and took turns shaking it while we walked around the garden, and in no time we had both fresh butter and buttermilk.
The buttermilk was incorporated into the corn flour batter and the butter we saved for later...
The kids rolled out the biscuit dough--some in funny shapes!
And we put the trays into the cob oven and baked them using heat from a wood fire.

Nice hot coals to bake delicious biscuits

When the biscuits were golden colored and ready to eat, we took the butter we had saved from the buttermilk process and added some honey to it to make delicious honey-butter...Yum!


Fresh, local ingredients, grown and harvested with care, became the tastiest biscuits.  It was truly a delicious, Slow Food, Farm to Table day in the garden.

Here is the recipe:

Cornmeal Buttermilk Biscuits (makes 8 biscuits)
1 1/3 Cup flour
2/3 Cup polenta style cornmeal
2 1/2 tsp baking powder
1/4 tsp baking soda
1 tsp sugar
1 tsp salt
6 Tbsp unsalted butter diced
3/4 Cup buttermilk

Preheat oven to 450 degrees F and line a baking sheet with parchment paper.  In a large bowl whisk flour, cornmeal, baking power, baking soda, sugar and salt.

Rub 2 Tablespoons butter into flour mixture with fingertips until incorporated.  Work remaining butter in until pea size.  Gently stir in buttermilk.

Roll dough out to 1/2 inch thickness, cut into desired shapes and bake for about 15 minutes.

Enjoy!!

Wednesday, March 6, 2013

March 6, 2013

Soil to Snack: Welcome St. Catherine and Orca K-8!
Fresh Harvest Nettles

Chocolate Stinging Nettle Crepes
 Tis' the season of newly emerging stinging nettles, perfect for soups, pesto and anything else....including crepes! Nettles can be found throughout our Pacific Northwest forests and are super abundant. Harvest only the upper leaves about 4-6 inches down the plant, and be sure to wear good gloves. So fun~

Ingredients
1/4 cup cocoa
1/2 cup flour, or 3/4 cup if you don't want to use cocoa
1 cup milk
2 eggs
1 tablespoon sugar
1 teaspoon salt
2 tablespoon melted butter
Chopped nettles on the top


Mix/whisk all your wet and dry ingredients together until smooth, without bumps and not too thick. If the consistency is thick like regular pancake batter, add some water to thin it out. Cook individual crepes in a frying pan, then add your chopped nettles to the top, as many as you like....Enjoy!

Thursday, February 28, 2013

Emerging Sugar Snap Pea
Radishes, broccoli, sugar snaps, lettuce, peppers, and more! It is the time of year for planting seeds for our Spring garden. We have been getting lots of help from our SOP students and their instructors, so here is what's sprouting in the garden greenhouse...

This last week with our students, we planted two types of broccoli, sweet peppers, lettuce varieties, and sugar snap peas. Many of them are already sprouting, less than a week later! Check them out....

East Port Orchard students from Teams Marsh, Rain, and Bog planted us some broccoli, and sugar snap peas. It is so amazing how these seeds sprout in such a short time when given the LAWS (light, air, water, and soil)! We also often put newly planted seeds on our heat mats in the greenhouse, to help them stay cozy to create ideal sprouting conditions.


Baby Pepper Emerging

Allen Creek students from Teams Thunder and Forest planted some lettuce varieties, and sweet peppers called Jimmy Nardello. We are so lucky to have so many happy hands helping us out...


Team Thunder planted some lettuce varieties, and they began sprouting in just three days! After they planted their seeds, they sprinkled a little forest soil on them to represent Team Thunder, and to leave a little bit of their experience here in the garden. Maybe it was magic soil that helped them sprout so quickly! 


In addition to all these new plantings, students from Catharine Blaine and Discovery Community School planted some broccoli and radishes that are growing up a storm. We are looking forward to transplanting the broccoli as soon as the weather gets a bit warmer, and the radishes should be ready to eat in the late spring. Thank you students!

Discovery Community School Radishes

Catharine Blaine Broccoli
 

Wednesday, February 27, 2013

February 27th, 2013

Soil to Snack~ Welcome East Port Orchard and Allen Creek!


 Potato Gnocchi!

Gnocchi is a delicious potato pasta dumpling, or also known as a "potato pillow of love". To add some color to your gnocchi, you can use purple, blue (yes, there are purple and blue potatoes!) or red potatoes...so cool!


Ingredients
2 Cups potatoes (boiled or roasted)  
2 Cups flour 
1 teaspoon both salt and pepper
1 egg


Mix the ingredients above into a ball of dough, dusting with flour so as not to stick to the table. Take a piece of the dough and roll it into a finger-width log. Cut into 1/2 inch pieces. Dip a fork in flour and roll the fork over each piece of gnocchi, gently making an impression. Make gnocchi out of all the dough.

Drop the gnocchi into boiling water (with oil) in small batches. As they arrive at the top of the water, scoop them out using a slotted spoon. Allow to cool on an oiled pan. 

Saute some veggies in olive oil and add in the gnocchi to warm them up. Or serve with your favorite tomato or pesto sauce. Yum!! 


Thursday, February 14, 2013

Broccoli and Radishes!

February 14, 2013.....Happy Valentine's Day!

Here are some updates for the broccoli planted by Catharine Blaine students, and radishes planted by our visiting students from Discovery Community School. They are all doing fantastic, and with hope of warmer weather on the horizon, we may be able to transplant some into the outdoor garden soon. Take a look!


These radishes, planted on January 16th from seed, are growing so fast we actually had to thin them a little. Thinning means pulling out a few plants in each row, which allows for each plant to have a little bit more room. This often helps each vegetable to grow bigger. It is good to plant them closer at first to ensure you get enough that sprout. Thank you Discovery Community School Students!


Beautiful Radish Leaves


Broccoli Babies
As for our broccoli sprouts planted January 30th by Catharine Blaine students, they are also flourishing and being a cooler weather crop, we may be able to transplant them as soon as they are big enough. Thank you CB students!